[WHS]4주차 모바일 앱 취약점 분석
개요
화이트햇 스쿨 1기 4주차에 진행이 되었던 김주원 멘토님의 모바일 앱 취약점 분석 과제에 대한 Wirteup을 작성했습니다.
BasicAndroid.apk
BasicAndroid.apk는 flag가 총 3개가 있고 그 3개를 이어붙이면 flag{xxxx} 형식의 flag문자열이 완성된다.
flag1.
처음 분석을 할 때 멘토님께서 말씀해주셨던 것처럼 모든 정보들이 있는 AndroidManifest.xml부터 살펴봤다.
1
2
3
4
5
6
7
8
9
10
11
12
13
14
15
16
17
18
19
20
21
22
23
24
25
26
27
28
<?xml version="1.0" encoding="utf-8"?>
<manifest xmlns:android="http://schemas.android.com/apk/res/android" android:versionCode="1" android:versionName="1.0" android:compileSdkVersion="31" android:compileSdkVersionCodename="12" package="demon.arrester.basicandroid" platformBuildVersionCode="31" platformBuildVersionName="12">
    <uses-sdk android:minSdkVersion="21" android:targetSdkVersion="31"/>
    <uses-permission android:name="android.permission.ACCESS_NETWORK_STATE"/>
    <uses-permission android:name="android.permission.INTERNET"/>
    <uses-permission android:name="android.permission.WAKE_LOCK"/>
    <uses-permission android:name="com.google.android.finsky.permission.BIND_GET_INSTALL_REFERRER_SERVICE"/>
    <application android:theme="@style/Theme.BasicAndroid" android:label="@string/app_name" android:icon="@mipmap/trip_android" android:allowBackup="true" android:supportsRtl="true" android:roundIcon="@mipmap/trip_android" android:appComponentFactory="androidx.core.app.CoreComponentFactory">
        <activity android:name="demon.arrester.basicandroid.SecretActivity" android:exported="true"/>
        <activity android:name="demon.arrester.basicandroid.MainActivity" android:exported="true">
            <intent-filter>
                <action android:name="android.intent.action.MAIN"/>
                <category android:name="android.intent.category.LAUNCHER"/>
            </intent-filter>
        </activity>
        <service android:name="com.google.firebase.components.ComponentDiscoveryService" android:exported="false" android:directBootAware="true">
            <meta-data android:name="com.google.firebase.components:com.google.firebase.database.DatabaseRegistrar" android:value="com.google.firebase.components.ComponentRegistrar"/>
            <meta-data android:name="com.google.firebase.components:com.google.firebase.analytics.connector.internal.AnalyticsConnectorRegistrar" android:value="com.google.firebase.components.ComponentRegistrar"/>
            <meta-data android:name="com.google.firebase.components:com.google.firebase.installations.FirebaseInstallationsRegistrar" android:value="com.google.firebase.components.ComponentRegistrar"/>
        </service>
        <receiver android:name="com.google.android.gms.measurement.AppMeasurementReceiver" android:enabled="true" android:exported="false"/>
        <service android:name="com.google.android.gms.measurement.AppMeasurementService" android:enabled="true" android:exported="false"/>
        <service android:name="com.google.android.gms.measurement.AppMeasurementJobService" android:permission="android.permission.BIND_JOB_SERVICE" android:enabled="true" android:exported="false"/>
        <provider android:name="com.google.firebase.provider.FirebaseInitProvider" android:exported="false" android:authorities="demon.arrester.basicandroid.firebaseinitprovider" android:initOrder="100" android:directBootAware="true"/>
        <activity android:theme="@android:style/Theme.Translucent.NoTitleBar" android:name="com.google.android.gms.common.api.GoogleApiActivity" android:exported="false"/>
        <meta-data android:name="com.google.android.gms.version" android:value="@integer/google_play_services_version"/>
    </application>
</manifest>
위 코드는 Manifest 파일인데 보면 demon.arrester.basicandroid.MainActivity가 앱을 실행할 경우 실행되 화면에 보여지는 것을 알 수 있다. 따라서 MainActivity부터 찾아봤다.
1
2
3
4
5
6
7
8
9
10
11
12
13
14
15
16
17
18
19
20
21
22
23
24
25
26
27
28
29
30
31
32
33
34
35
36
37
38
39
40
41
42
43
44
45
46
47
48
49
50
51
52
package demon.arrester.basicandroid;

import android.os.Bundle;
import android.util.Log;
import android.view.View;
import android.widget.Button;
import android.widget.Toast;
import androidx.appcompat.app.AppCompatActivity;
import com.google.firebase.database.DataSnapshot;
import com.google.firebase.database.DatabaseError;
import com.google.firebase.database.DatabaseReference;
import com.google.firebase.database.FirebaseDatabase;
import com.google.firebase.database.ValueEventListener;

/* loaded from: classes.dex */
public class MainActivity extends AppCompatActivity implements View.OnClickListener {
    Button mobilehacking_btn;
    DatabaseReference mDBReference = null;
    String first_flag = "";

    /* JADX INFO: Access modifiers changed from: protected */
    @Override // androidx.appcompat.app.AppCompatActivity, androidx.fragment.app.FragmentActivity, androidx.activity.ComponentActivity, androidx.core.app.ComponentActivity, android.app.Activity
    public void onCreate(Bundle bundle) {
        super.onCreate(bundle);
        setContentView(R.layout.activity_main);
        Button button = (Button) findViewById(R.id.mobilehacking_btn);
        this.mobilehacking_btn = button;
        button.setOnClickListener(this);
        DatabaseReference reference = FirebaseDatabase.getInstance().getReference();
        this.mDBReference = reference;
        reference.child("mobilehackingkr").child("first_flag").addValueEventListener(new ValueEventListener() { // from class: demon.arrester.basicandroid.MainActivity.1
            @Override // com.google.firebase.database.ValueEventListener
            public void onDataChange(DataSnapshot dataSnapshot) {
                MainActivity.this.first_flag = dataSnapshot.getValue().toString();
            }

            @Override // com.google.firebase.database.ValueEventListener
            public void onCancelled(DatabaseError databaseError) {
                MainActivity.this.first_flag = "error";
            }
        });
    }

    @Override // android.view.View.OnClickListener
    public void onClick(View view) {
        if (view.getId() != R.id.mobilehacking_btn) {
            return;
        }
        Toast.makeText(this, "good find flag!", 0).show();
        Log.e("first_flag", "first flag: " + this.first_flag);
    }
}
위는 Mainactivity파일로 java로 디컴파일되있는 것을 확인할 수 있다. 코드를 보면 가장 눈에 띄는 것이있는데 바로 “first_flag”문자열이다. first_flag 값을 잘 분석해보면 이곳에서 첫번째 flag를 획득할 수 있다는것을 예측할 수 있다. 현재 이 코드에서 밑에 onClick부분을 살펴봤다.
1
2
3
4
5
6
7
8
@Override // android.view.View.OnClickListener
    public void onClick(View view) {
        if (view.getId() != R.id.mobilehacking_btn) {
            return;
        }
        Toast.makeText(this, "good find flag!", 0).show();
        Log.e("first_flag", "first flag: " + this.first_flag);
    }
해당 코드를 보면 어떤 버튼이 존재하고 그 버튼을 클릭할 경우 해당 버튼의 id가 mobilehacking_btn id와 일치할 경우 밑에 코드들이 실행돼 Toast창으로 “good find flag!”가 출력될것이고, 그 다음줄을 보면 Log라는 단어가 눈에 들어온다. 따라서 android studio에서 해당 앱을 실행 후 버튼을 클릭한 결과
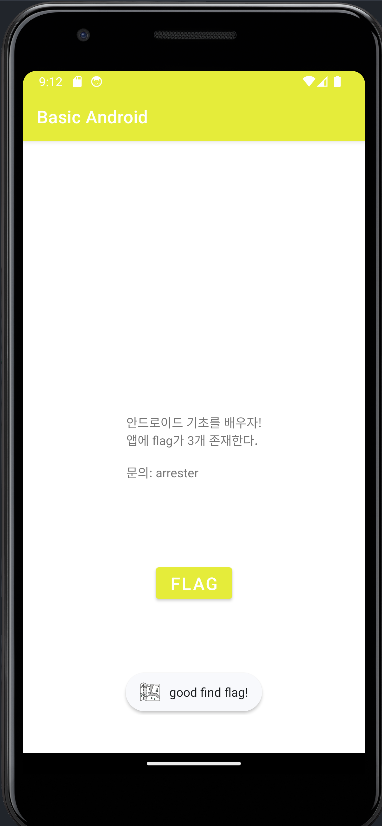
해당 화면이 나온것을 확인할 수 있다. 그리고 Logcat을 이용해 log를 확인해본결과

log에 first_flag가 출력이 된 것을 확인할 수 있다.
1
first_flag: flag{1ogcat
flag2.
사실 해당 문제를 풀때 first_flag보다 second_flag를 더 빨리 발견했는데, 그 이유는 해당 수업을 진행할 때 실습문제에서 res폴더안에 flag.txt파일이 있던것이 떠올랐고 바로 res폴더안에 flag.txt와 비슷한 파일이 있나 확인해봤다.
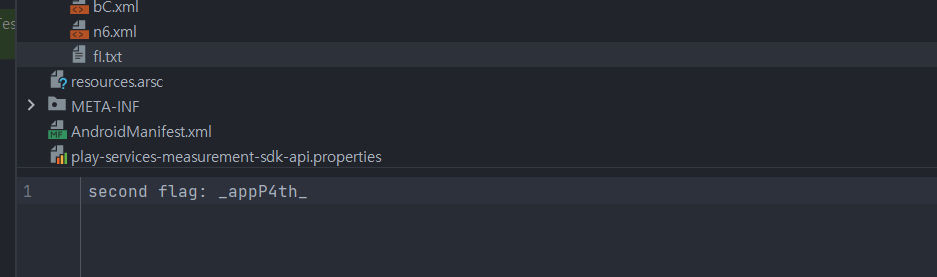
결과적으로 해당 파일이 존재했고 flag앞에 second flag라는 문자를 봐서 두번째 flag라는 것을 알 수 있다.
1
2
3
4
first_flag: flag{1ogcat
`second flag: _appP4th_

total flag: flag{1ogcat_appP4th_
flag3.
처음 AndroidManifest.xml 파일로 돌아가보면 MainActivity말고 다른 SecretActivity도 존재한다는 것을 알 수 있다.
1
2
3
4
5
6
7
<activity android:name="demon.arrester.basicandroid.SecretActivity" android:exported="true"/>
<activity android:name="demon.arrester.basicandroid.MainActivity" android:exported="true">
    <intent-filter>
        <action android:name="android.intent.action.MAIN"/>
        <category android:name="android.intent.category.LAUNCHER"/>
    </intent-filter>
</activity>
해당 부분을 Chatgpt에 질문해본결과 해당 코드는 앱을 실행할때 MainActivity를 실행한다는 것을 알아냈다. 그래서 처음 first_flag를 찾을 때 왜 MainActivity의 layout이 보였는지 알게 됬다. 따라서 이부분을
1
2
3
4
5
6
7
<activity android:name="demon.arrester.basicandroid.SecretActivity" android:exported="true">
    <intent-filter>
        <action android:name="android.intent.action.MAIN"/>
        <category android:name="android.intent.category.LAUNCHER"/>
    </intent-filter>
</activity>
<activity android:name="demon.arrester.basicandroid.MainActivity" android:exported="true" />
이런식으로 수정한뒤 리패키징을 하고 SecretActivity layout이 보여지도록 했다.
SecretActivity의 파일을 살펴보면
1
2
3
4
5
6
7
8
9
10
11
12
13
14
15
16
17
18
19
20
21
22
23
24
25
26
27
28
29
30
31
32
33
34
35
36
37
38
39
40
41
42
43
44
45
46
47
48
49
50
51
52
53
54
55
56
57
58
59
60
61
62
63
64
package demon.arrester.basicandroid;

import android.os.Bundle;
import android.view.View;
import android.widget.Button;
import android.widget.TextView;
import android.widget.Toast;
import androidx.appcompat.app.AppCompatActivity;
import com.google.firebase.database.DataSnapshot;
import com.google.firebase.database.DatabaseError;
import com.google.firebase.database.DatabaseReference;
import com.google.firebase.database.FirebaseDatabase;
import com.google.firebase.database.ValueEventListener;
import java.io.InputStream;

/* loaded from: classes.dex */
public class SecretActivity extends AppCompatActivity implements View.OnClickListener {
    Button final_btn;
    TextView secret_msg;
    String flag = "";
    String third_flag = "";
    DatabaseReference mDBReference = null;

    /* JADX INFO: Access modifiers changed from: protected */
    @Override // androidx.appcompat.app.AppCompatActivity, androidx.fragment.app.FragmentActivity, androidx.activity.ComponentActivity, androidx.core.app.ComponentActivity, android.app.Activity
    public void onCreate(Bundle bundle) {
        super.onCreate(bundle);
        setContentView(R.layout.activity_secret);
        this.secret_msg = (TextView) findViewById(R.id.secret_msg);
        Button button = (Button) findViewById(R.id.final_btn);
        this.final_btn = button;
        button.setOnClickListener(this);
        try {
            InputStream openRawResource = getResources().openRawResource(R.raw.flag);
            byte[] bArr = new byte[openRawResource.available()];
            openRawResource.read(bArr);
            this.flag = new String(bArr);
        } catch (Exception unused) {
            this.flag = "fail";
        }
        this.secret_msg.setText("find second flag");
        DatabaseReference reference = FirebaseDatabase.getInstance().getReference();
        this.mDBReference = reference;
        reference.child("mobilehackingkr").child("third_flag").addValueEventListener(new ValueEventListener() { // from class: demon.arrester.basicandroid.SecretActivity.1
            @Override // com.google.firebase.database.ValueEventListener
            public void onDataChange(DataSnapshot dataSnapshot) {
                SecretActivity.this.third_flag = dataSnapshot.getValue().toString();
            }

            @Override // com.google.firebase.database.ValueEventListener
            public void onCancelled(DatabaseError databaseError) {
                SecretActivity.this.third_flag = "error";
            }
        });
    }

    @Override // android.view.View.OnClickListener
    public void onClick(View view) {
        if (view.getId() != R.id.final_btn) {
            return;
        }
        Toast.makeText(this, "third flag: " + this.third_flag, 0).show();
    }
}
위와같다.
코드를 살펴본결과 third flag 문자열이 눈에 보이고 처음 first_flag를 찾을 때 봤던 코드와 같이 onClick method가 존재하는 것을 확인했다.
1
2
3
4
5
6
7
@Override // android.view.View.OnClickListener
    public void onClick(View view) {
        if (view.getId() != R.id.final_btn) {
            return;
        }
        Toast.makeText(this, "third flag: " + this.third_flag, 0).show();
    }
해당 코드를 보면 어떤 버튼이 존재하는데 그것을 클릭할 경우 그 버튼의 id가 final_btn과 같을 경우 Toast창으로 third flag를 출력한다는 것을 알 수 있다. 따라서 이것 또한 android studio 애뮬레이터에서 리패키징한 apk파일을 설치한 뒤 실행하고 버튼을 클릭한결과
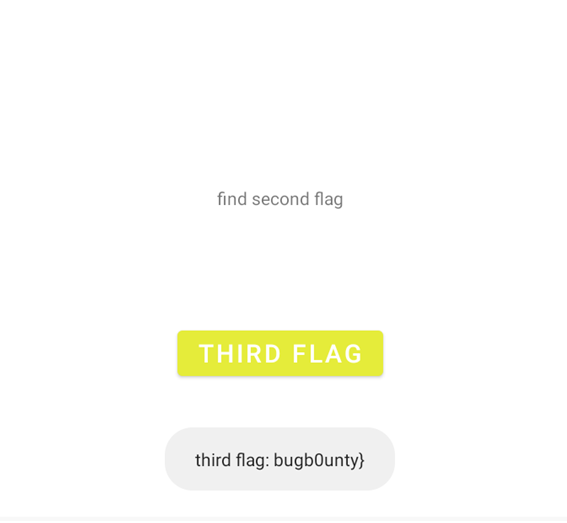
마지막 third_flag를 획득할 수 있다.
1
2
3
4
5
first_flag: flag{1ogcat
second flag: _appP4th_
third_flag: bugb0unty}

total flag: flag{1ogcat_appP4th_bugb0unty}